Have you ever wanted to dig into non-linear video on the web, but didn’t know how and where to start from scratch? This article will guide you through the very basics on the way to your first interactive video experiment.
Result
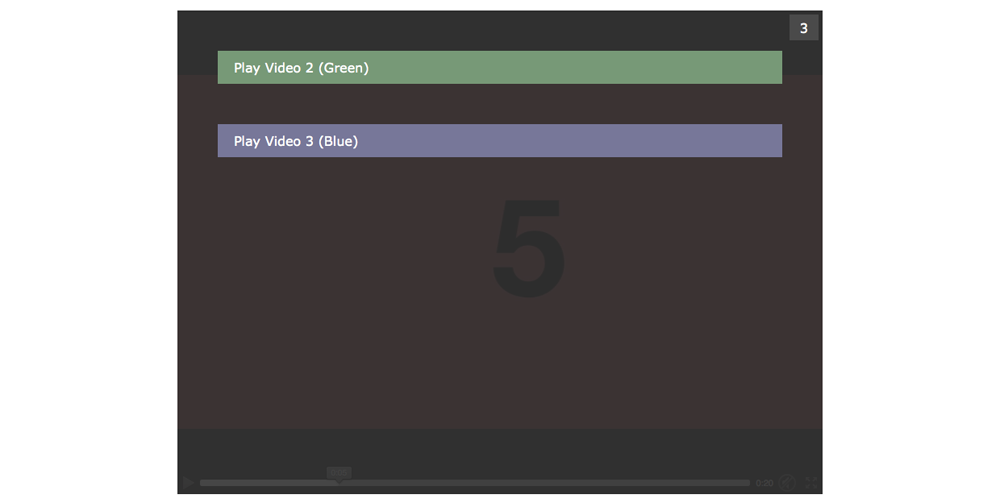
What we’ll get in the end is a a dead simple template for non-linear video, written entirely in HTML, CSS and Javascript (+ jQuery & awesome PopcornJS). No nested function calls, no custom video player, no predefined class-system, no fancy design, just a code-basis that will allow you to:
- add overlays at certain points of time, that pause the video and let the user decide how to continue
- add timeouts to those overlays, so the video continues when no action is taken
- resume to the last ‘decision overlay’ when a video ends
- add other types of timebased overlays (ie. a website)
Let’s get started
First, we need a wrapper that includes our example videos:
<div id="mainVideoWrapper">
	<video id="video1" controls="controls">
		<source src="videos/startvideo.webm" type="video/webm">
		<source src="videos/startvideo.mp4" type="video/mp4">
	</video>
	<video id="video2" controls="controls">
		<source src="videos/video-2.webm" type="video/webm">
		<source src="videos/video-2.mp4" type="video/mp4">
	</video>
	<video id="video3" controls="controls">
		<source src="videos/video-3.webm" type="video/webm">
		<source src="videos/video-3.mp4" type="video/mp4">
	</video>
</div>
Then we define overlay elements:
<div class="choiceOverlay" id="choice1">
	<div class="action1">Play Video 2 (Green)</div>
	<div class="action2">Play Video 3 (Blue)</div>
</div>
<div class="choiceOverlay" id="choice2">
	<div class="action1">Play Video 1 (Red)</div>
	<div class="action2">Play Video 3 (Blue)</div>
</div>
<div class="choiceOverlay" id="choice3">
	<div class="action1">Play Video 1 (Red)</div>
	<div class="action2">Play Video 2 (Green)</div>
</div>
We’ll skip other overlays like websites etc. for the moment, as our focus is on non-linear video. You can however find those examples in the full source code.
Now some styling. As we want to show only one video at a time, we can stack them all on top of each other. This way we can switch through the videos by simply changing which one is visible.
#mainVideoWrapper video {
	position: absolute;
	width: 100%;
	height: 100%;
	display: none;
}
To also have our overlays relatively positioned on top of the videos, we wrap everything we have inside a
<div id="content">...</div>element. As we want to show a counter for some decision overlays, we add that element too. Now we have the following structure in html:
<div id="content">

	<div id="mainVideoWrapper">

		<!-- Startvideo -->
		<video id="video1" controls="controls">
			<source src="videos/startvideo.webm" type="video/webm">
			<source src="videos/startvideo.mp4" type="video/mp4">
		</video>

		<!-- Alternative Videos -->
		<video id="video2" controls="controls">
			<source src="videos/video-2.webm" type="video/webm">
			<source src="videos/video-2.mp4" type="video/mp4">
		</video>

		<video id="video3" controls="controls">
			<source src="videos/video-3.webm" type="video/webm">
			<source src="videos/video-3.mp4" type="video/mp4">
		</video>

	</div>


	<!-- Decision-Overlays, that lay on top of the videos and are shown at certain points of time. -->
	<div class="choiceOverlay" id="choice1">
		<div class="action1">Play Video 2 (Green)</div>
		<div class="action2">Play Video 3 (Blue)</div>
	</div>

	<div class="choiceOverlay" id="choice2">
		<div class="action1">Play Video 1 (Red)</div>
		<div class="action2">Play Video 3 (Blue)</div>
	</div>

	<div class="choiceOverlay" id="choice3">
		<div class="action1">Play Video 1 (Red)</div>
		<div class="action2">Play Video 2 (Green)</div>
	</div>

	<!-- Counter for Decision-Overlays -->
	<div id="choiceOverlayCounter">4</div>

</div>
and the following CSS:
#content {
	position: absolute;
	width: 800px;
	height: 600px;
	left: 50%;
	top: 50%;
	margin-left: -400px;
	margin-top: -300px;
}

#content #mainVideoWrapper {
	width: 100%;
	height: 100%;
	background: #222;
}

#content #mainVideoWrapper video {
	position: absolute;
	width: 100%;
	height: 100%;
	display: none;
}

#content .choiceOverlay {
	position: absolute;
	width: 100%;
	height: 100%;
	top: 0;
	left: 0;
	z-index: 10;
	display: none;
}

#content #choiceOverlayCounter {
	position: absolute;
	width: 20px;
	height: 20px;
	top: 5px;
	right: 5px;
	z-index: 11;
	display: none;
}
Introducing time
Now to the fun part: timebased events!
In order to manage our events, we will use the PopcornJS HTML5 Media Library. This later allows you to use existing Popcorn-Plugins for your project. But keep in mind that you can also do everything we do here in plain javascript, without jQuery and PopcornJS.
First, we have to initialize our videos as Popcorn instances and decide which is the startvideo. That’s as easy as this:
var video1 = Popcorn('#video1');
var video2 = Popcorn('#video2');
var video3 = Popcorn('#video3');

// show startvideo
$("#video1").show();
(the ID’s refer to the ID’s we gave our video elements in the html)
Example: Decision Overlay with Counter
For our counter, we need three globally accessible variables:
var choiceTimeout;
var choiceTimeoutCount;
var choiceTimeoutDuration = 4; // Duration in seconds
Now we can add a timebased event, that pauses video 1 at 5 seconds, shows our decision overlay and continues after our 4 second counter is at 0:
video1.cue(5, function() {

	video1.pause();

	$(".choiceOverlay#choice1").show();

	// After a certain timespan, go back to the video
	// (duration is defined in choiceTimeoutDuration)
	choiceTimeoutCount = choiceTimeoutDuration;
	$("#choiceOverlayCounter").text(choiceTimeoutCount).show();

	choiceTimeout = window.setInterval(function() {

		if (choiceTimeoutCount < 0) {

			window.clearInterval(choiceTimeout);
			$("#choiceOverlayCounter").hide();
			$(".choiceOverlay#choice1").hide();
			video1.play();

		} else {

			$("#choiceOverlayCounter").text(choiceTimeoutCount);
			choiceTimeoutCount--;

		}

	}, 1000);

});
But we don't just want to show and hide the overlay, we also want to allow user interaction. So we register a click event on the elements inside our decision overlay, that cancels the timeout, hides the overlay and plays the chosen video at a certain position:
$(".choiceOverlay#choice1 .action1").click(function() {

	// stop timeout, as something was chosen
	window.clearInterval(choiceTimeout);

	// hide counter, overlays & videos
	$("#choiceOverlayCounter").hide();
	$(".choiceOverlay").hide();
	$("video").hide();

	// show and play video 2 at a certain position (0 seconds)
	$("#video2").show();
	video2.play(0);

});
That's basically it! In the demo, I added a little more styling and functionality (ie. resuming to the last decision overlay at the end of a video, using a background image for decision overlays and showing a website as simple timebased overlay).
Thanks for your interest in that small tutorial, now
Play with the Demo and Download Source (ZIP)


